Add or Edit a Sequence
- 08 Aug 2023
- 5 Minutes to read
- Contributors


- Print
- Comment
- DarkLight
Add or Edit a Sequence
- Updated on 08 Aug 2023
- 5 Minutes to read
- Contributors
- Print
- Comment
- DarkLight
Article summary
Did you find this summary helpful?
Thank you for your feedback
You can add your own custom sequences to your Workspace as the needs arise. Once you add a new Sequence you'll be able to assign it to Opportunities across your entire Workspace.
Add a new Sequence
- Select any Team that you wish to view
- Select Sequences in the left menu
- Click ➕ to create a new sequence

- Type in the name of your Sequence
- Type in the description of your Sequence
- Click Save

Next, you want to add the steps to your sequence in your preferred order and at specific intervals.
Add Steps to your Sequence
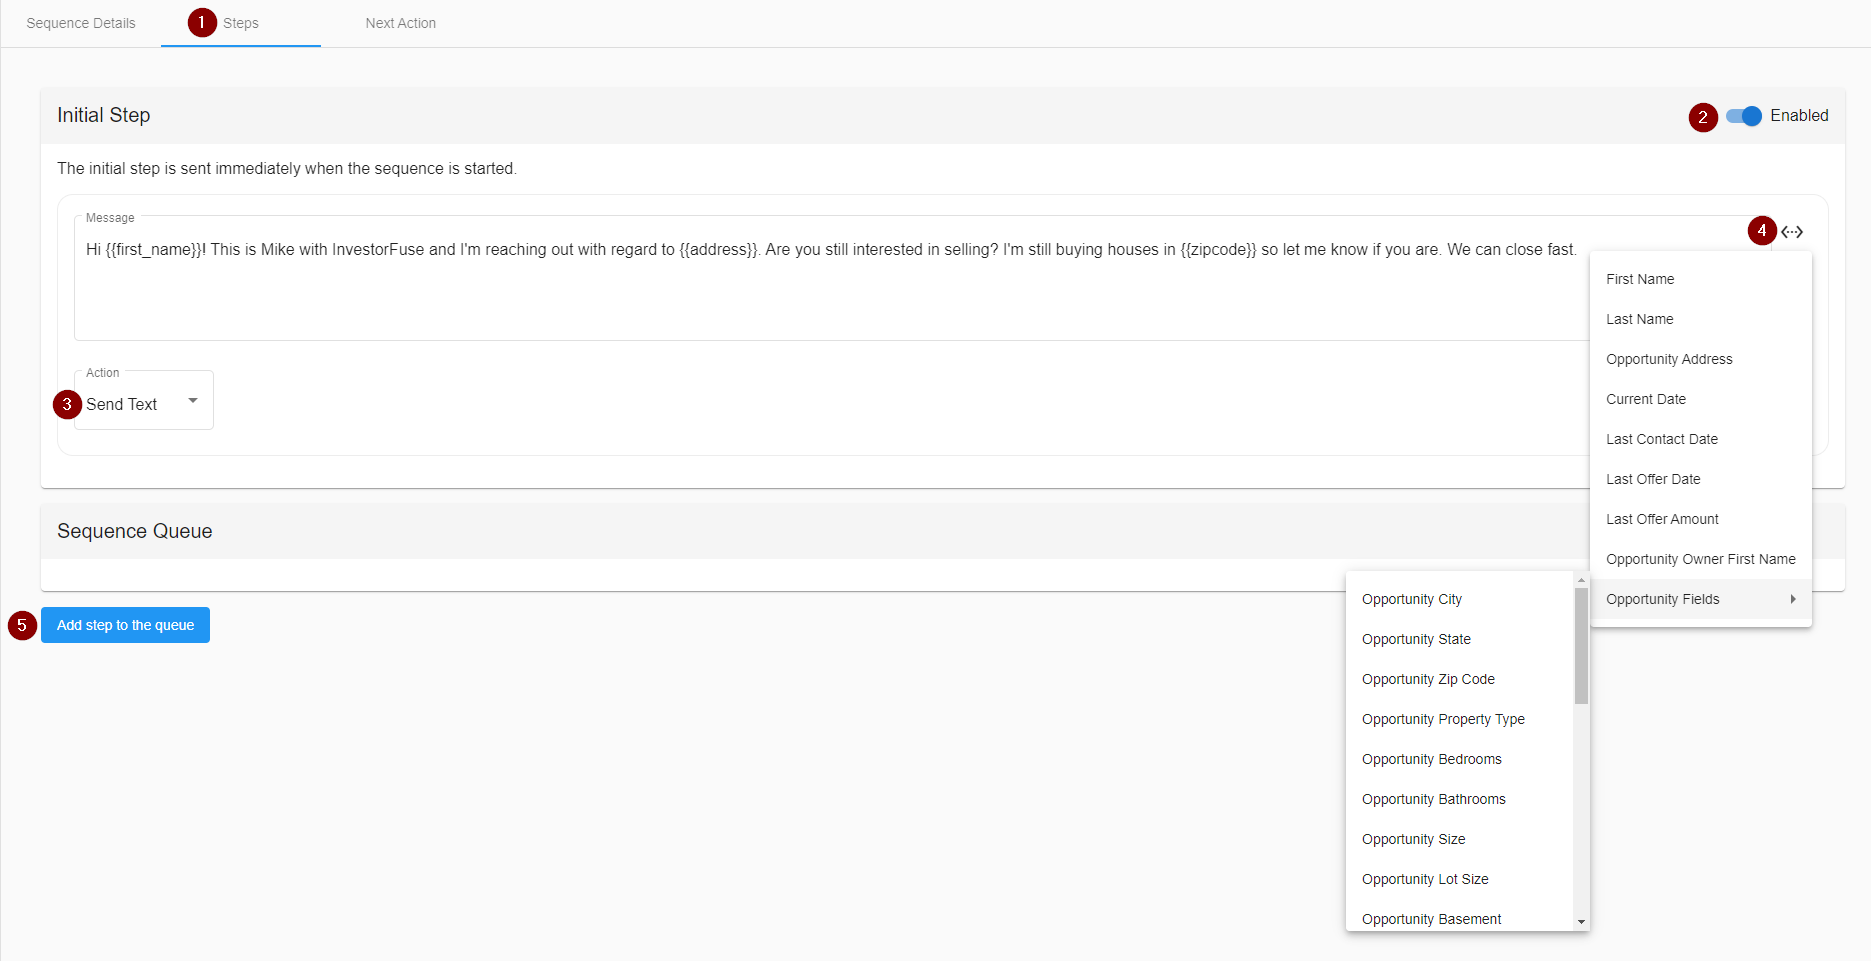
- Click the Steps tab inside of the sequence
- Toggle the Initial step on or off. Turning this on will immediately send a message to the seller as soon as the sequence is started. If you turn this off, you can have the initial message go out a few days, weeks, or months later after starting the sequence.
- Select the Action whether that be an email message, text, voicemail, direct mail, or a custom task
- If you are sending a message, you can drop tokens like the seller first name, address, or other opportunity-specific info like size (sqft), etc. to incorporate into your message.
- Click Add Step to the Queue to add the next step

Send Email
- Change the Action box to Send Email
- Input the Step Name. This is what you want to call this specific step and is purely internal
- Put a subject for the email
- Enter the message that you want to send
- Set the number of days for the step to trigger once the sequence is started
- Set a time to send this message. If blank, it will send at 9 am on the scheduled day using your team's timezone


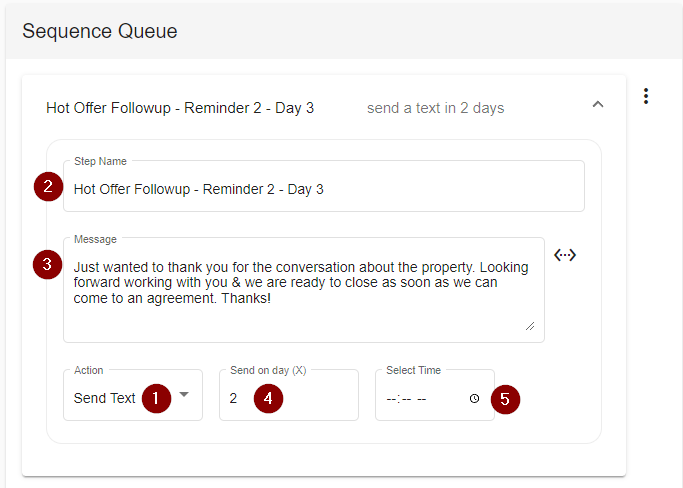
Send Text
- Change the Action box to Send Text
- Input the Step Name. This is what you want to call this specific step and is purely internal
- Enter the message that you want to send
- Set the number of days for the step to trigger once the sequence is started
- Set a time to send this message. If blank, it will send at 9 am on the scheduled day using your team's timezone

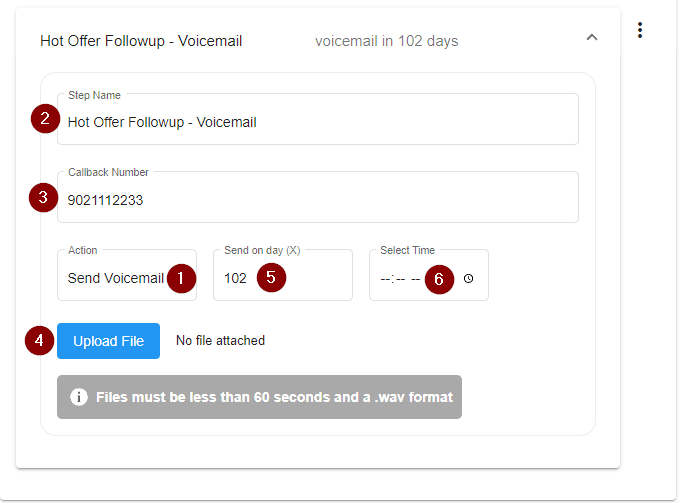
Send Voicemail
- Change the Action box to Send Voicemail
- Input the Step Name. This is what you want to call this specific step and is purely internal
- Enter your preferred Callback number. This is also going to be the Caller ID and what the seller will see when they get the recording.
- Upload your voicemail into this step. It has to be less than 60 seconds and in .wav format. You can use online recorders to record in this format.
- Set the number of days for the step to trigger once the sequence is started
- Set a time to send this message. If blank, it will send at 9 am on the scheduled day using your team's timezone

Send Direct Mail via PrintGenie
- Change the Action box to Send Direct Mail via PrintGenie
- Input the Step Name. This is what you want to call this specific step and is purely internal
- Go to PrintGenie and log in to your account. If you do not have an account, you can sign up here.
- In their left menu, go to Mail Templates
- Select the template that you want to send through the sequence and click the API / Webhook icon

- Copy the generated Webhook
- Go back to InvestorFuse and paste the webhook into the PrintGenie Webhook URL field
- Set the number of days for the step to trigger once the sequence is started
- Set a time to send this message. If blank, it will send at 9 am on the scheduled day using your team's timezone


When you start a sequence with a Direct Mail step, InvestorFuse will prompt you to double-check the mailing address of the seller. There has to be a mailing address saved on the contact for this to work. If you do not have one on file, click the Pull Mailing Address from Public Records to automatically populate the fields using public information.

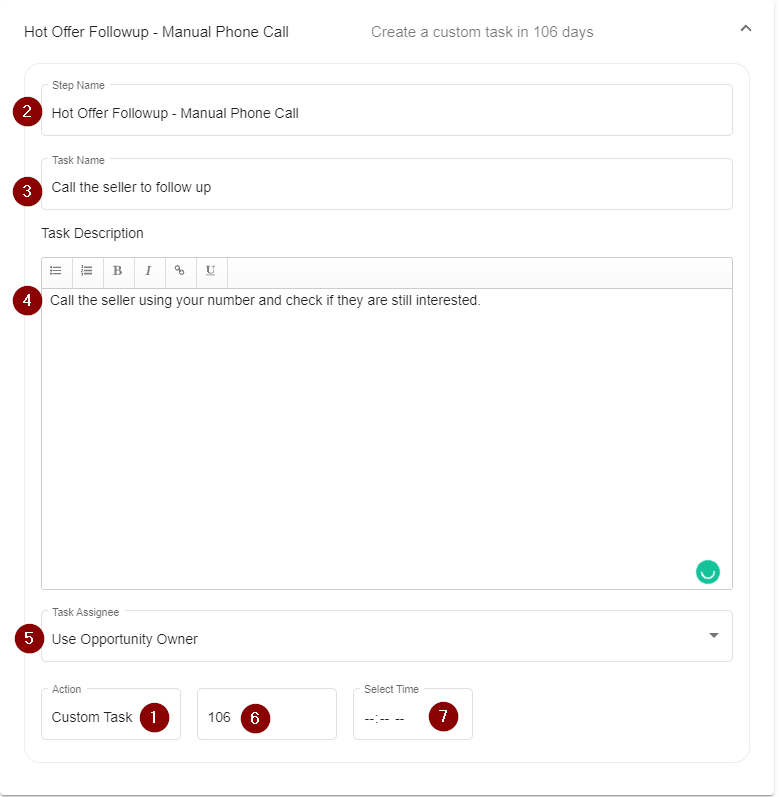
Custom Task
- Change the Action box to Custom Task
- Input the Step name. This is what you want to call this specific step and is purely internal
- Enter the Task name. This is what will show up in the Actions of the assignee
- Write a description of the task if needed
- Select an assignee for the task
- Set the number of days for the step to trigger once the sequence is started
- Set a time to send this message. If blank, it will send at 9 am on the scheduled day using your team's timezone

Trigger Webhook
- Change the Action box to Trigger Webhook
- Input the Step Name. This is what you want to call this specific step and is purely internal
- Input the Webhook URL that you generated.
- Set the number of days for the step to trigger once the sequence is started
- Set a time to send this message. If blank, it will send at 9 am on the scheduled day using your team's timezone.

Rearrange Steps
After your sequence is complete, it will show your list in order by the entry. You can re-order your Sequence or delete a Step by clicking on the three-dot icon to the right of each sequence and click Move Up, Move Down, or Delete Step. Keep in mind that this will not change the order of when your steps will trigger unless you change the Send on Day (X) field as well.

Finish your Sequence by Adding the Next Action
- After you have entered all the Steps, click the Next Action tab
- Select the Action you would like to assign after all steps in the sequence have been taken. The Sequences that are in your Market Space by default are set to Follow up with Seller and assigned to the owner of the Market Space. You can change this to mark the opportunity dead as soon as the sequence is complete, assign a due diligence action, etc.
- Select the Assignee
- Add instructions for the Assignee
- Click Save
IMPORTANT
Setting a Next Action is crucial to put the opportunity back into the pipeline after the sequence is complete. If there is no Next Action set, the system will assign 'Follow up with seller' by default and assign it to the Opportunity Owner.

Edit an Existing Sequence
Navigate to any Sequence, Steps, or Actions in any sequence and make any changes accordingly. You can do anything that is mentioned above when you are editing sequences. After your changes are made click on the Save icon.
Duplicate a Sequence
1. Navigate to the Sequence you wish to Delete.
2. Click the three dots on the right hand side of your screen
3. Click Duplicate

Delete a Sequence
1. Navigate to the Sequence you wish to delete.
2. Click the three dots on the right hand side of your screen
3. Click Delete

Was this article helpful?