Opportunity Info
- 04 Jan 2024
- 7 Minutes to read
- Contributors


- Print
- Comment
- DarkLight
Opportunity Info
- Updated on 04 Jan 2024
- 7 Minutes to read
- Contributors
- Print
- Comment
- DarkLight
Article Summary
Share feedback
Thanks for sharing your feedback!
Once your Opportunity has been created you can add more information to it and start tracking activity, offers, etc. Much of this data will be captured as your Activities are completed and created but you also have the option of filling in as much information as you want about each one based on your preferences.
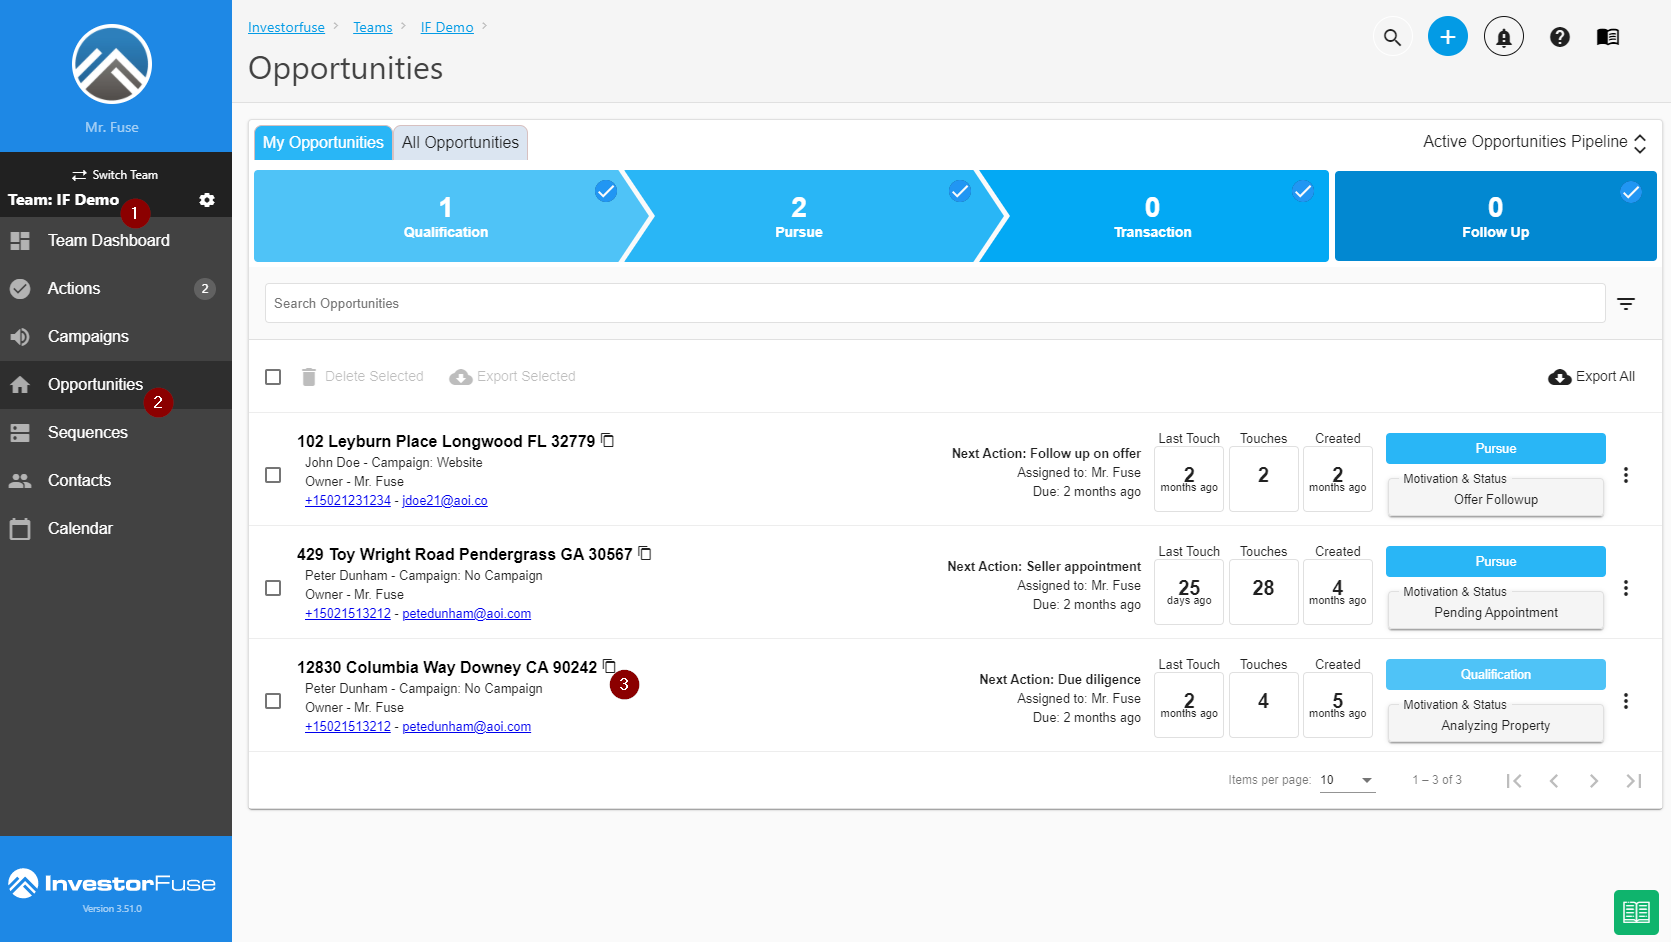
Locate your Opportunity
- Select any Team in the left menu
- Click Opportunities
- Search for or filter the Opportunity you're looking for and click on the address to edit
- Click the Opportunity/Property Address to view the Opportunity

Opportunity Info
Once you're inside the Opportunity you'll see all of the information and activities that belong to it. Some of this information is for viewing only and some can be edited from this location.
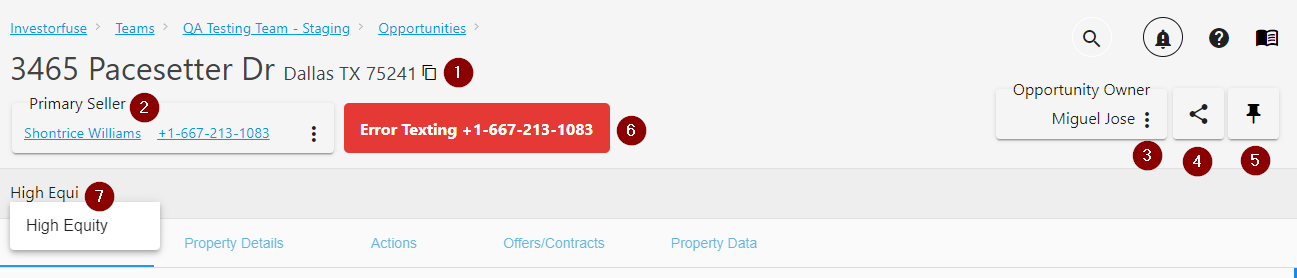
- Property Address
- Seller information
- Click on the Seller name to edit the current Sellers contact information
- Call the seller from an app on your computer by clicking the phone number
- Email the seller by clicking on their email address which will open up the default email app on your computer. Emailing the seller via this route will NOT record the email anywhere in IF3 so it's advisable if you want to track the email communication you do so using the Activity and Communication Log.
- Edit the Seller or view the Seller info by clicking ⋮ the three-dot icon Click-to-Call FunctionalityIn order for you to use Click-to-Call functionality within InvestorFuse, your browser must support it and you must install a third-party app that integrates with Click-to-Call. CallRail is one app that works within IF3 but things change so we suggest you research these apps and test them before you buy.
- Change the Opportunity Owner by clicking ⋮ the three-dot icon
- Share the Opportunity with someone outside of IF3. This will let them log in to the system and view this specific Opportunity or the ones you shared with them.
- Click 📌 the Pin icon to pin the Opportunity
- This red error button will appear if our texting provider, Twilio, is having an issue sending a text message to the contact. The error message will pop up if you click it.
- Add or remove custom Labels which is like a tagging system and can be used to filter and categorize Opportunities in other areas of IF3. Add the Labels that you want to add in the Labels section then type the Label you want to add here and select the correct label. Enter as many Labels as you'd like here.

Opportunity Location in the Pipeline
6. The Pipeline shows where the Opportunity is in the Pipeline process as well as details about what Action is currently assigned and to whom.
7. You can click on the Action to edit it
8. Click the three dots to change the status of the Action which will automatically complete the current Action that is assigned.

If there is an offer on the property you'll see a banner across the top showing information on your offer including the offer price, profit and the expiration date.

Property
9. The property image from Google Street view will populate by default, click the map icon to view Google Maps instead of the property image.

9.2. Replace the Google Street View with your own image if you want to have a custom view of the property. The custom image will be displayed by default instead of the Google Street View.
9.3. Click the Trash can icon to remove the custom image

Important Opportunity Info
Uncontacted and Contacted
This is the communication status of the opportunity. It indicates whether you already spoke to the seller or not. By default, new opportunities will have the Uncontacted status and there are two ways to update this.
- Manually change the status by clicking the Contacted button in the Important Opportunity Info
- Automatically when you select the outcome "I got a hold of the seller" to actions like Call New Lead or Follow up with seller.

Below Uncontacted and Contacted is a custom view that you can configure. You may select what information is important to summarize here every time you check it.
10. Click ⋮ the three dots menu

11. Select up to eight items or fields you wish to view consistently, this information will persist across all of your Opportunities.
12. After you have made your selections click Save

You can always change this information by unselecting one and selecting another but the maximum number of selections is four.
Touches and Date Trackers
Touches Definition
A Touch is when you update an opportunity by completing an action, sending a text, an email, or placing an outbound call using an integrated phone system like smrtPhone or Callrail.
This information is quick at-a-glance nominal information for:
- How many days ago it was last touched
- The total number of touches
- How long ago it was created
- When the last inbound communication was
- How many days ago it was resurfaced
- How many times it has been resurfaced
- How many days ago it was Qualified
- When the first appointment was
- How many days ago was the first offer made
- How many days ago was the first contract sent
- How many days ago was the last Transaction
- How many days ago was it closed
You can hover over each of the numbers to get the exact dates.

smrtPhone KPIs
If you have smrtPhone integrated, you will see more info below the touches. It shows you the total inbound and outbound calls, calls per minute, and talk time of the specific opportunity.

Activity and Communication Log
Here you can see all activity for your Opportunity including emails send, phone calls made, comments, assignments, etc. The icons are filters for each type of communications you want to view and you can also start communications from this screen via email and text and make comments about the Opportunity.
13. Click the View All menu item to see all activity on this Opportunity in a list
14. Click the Communication Icon to view a list of only text and email communications for this Opportunity
15. Click the Comment icon to see a list of all Comments
16. Click the Checkbox icon to see a list of all completed items
Add Communication or Comments
From any of the above filter locations, at the end of each list you can send communications and make comments about the Opportunity.
17. Click the drop-down box and select Add Comment, Send Email or Send Text Message
18. If you have text or email templates saved, click the drop-down and select one that you want to send
19. Fill out the remainder of the text boxes as prompted
20. Click Send or Add Comment. The system will prompt you to choose a number to send the text from.
21. If sending an email, you can attach a file to the message. The attachments sent and received will be saved in the File Attachments tab.
Templates Functionality
Templates is only available to Pro and Premium plans. If you are on Essentials and would like to upgrade, please email billing@investorfuse.com or send our support team a chat.

Resources
Click the Zillow icon to view the property information on Zillow in a new window.

Campaign
This will usually be auto-populated when the new lead/Opportunity is created from your integrations but if it's not for some reason or you wish to change it you can do so here. If an existing seller goes through one of your lead sources the second time around, the system will display which campaign they went through as an additional campaign.

External Sending
Manually send the opportunity details to external tools. The button will only appear if the current action matches the trigger in the External Sending item. Read this article to know how to set up External Sending.
Premium Feature
External Sending is only available to Premium Users. If you are interested in upgrading, please email billing@investorfuse.com.

Notes
Notes for this Opportunity can be added or edited here by clicking the blue Notes bar on the right side of the screen. Click on the Edit Note button on the right corner of the header to enter your content and click Done.

Offers
All Offers that have been made under this Opportunity will be listed here. You can view, download/save or print all offers made on this property directly from this screen.

File Attachments
Click Upload File to upload documents and images.
If there are images or documents currently uploaded you can delete them here by clicking on the Garbage Can icon, it will turn red then click it again to confirm.

Allowable files for upload
You can upload most files including Microsoft Office files, PDF, JPG, and PNG. In order to upload Google Docs files you'll need to download them from Google Docs first, save them as CSV, DOC, XLS files first and then upload to IF3. You can add Google Doc files in this screen as links however if that is easier for you and your team.
Links
Enter the link and add a description for it. If you add a description, the system displays this instead of the link to easily identify it among other links.

Advanced / Delete Opportunity
You may delete this Opportunity here by typing the word delete in the text box. Once you type in the word delete you'll be able to confirm deletion by clicking Delete Opportunity.

Was this article helpful?